Research group in emergent narratives
[Tutorial/Manual] Blabbeur – Adaptative Text Generation for Unity
What is Blabbeur?
Imagine your game needs to display this text:
- Hey! This is just to say that Alex just landed in Montréal and that he is doing fine.
Except, that the name of the person, their gender, the place where they landed and their health status might be different when that line is to be printed. Possible outcomes could look like:
- Yo! This is just to say that Sonia just landed in Paris and that she is in a sorry state.
- Dude! This is just to say that Emilio just landed in Abidjan and that he is in one piece.
In our project, pretty much all text requires this level of adaptativity (and more!) so we designed a tool (Blabbeur) to allow authors to easily cope with these problems while affording them creativity.
Blabbeur is an author-friendly text generation system allowing context adaptation and variability.
This simple Blabbeur grammar would easily take care of the above problem:
Blabbeur is free and here’s how you can use it in your project.
Table of Contents
Basic Text Generation
- Installing Blabbeur in your Unity Project
- Setting up the Unity Scene
- Writing a simple Blabbeur Grammar
- Calling Blabbeur from a Unity Script
Using Variables
- Integrating Variables in Blabbeur Grammars
- Passing Variables to Blabbeur
- Bundling properties for more complex objects
- Interfacing directly with your own classes
Utilities
- Grammar Syntax Recap
- Syntax Highlighting in Sublime Text
- The .blab file extension
- The Blabbeur Test Scene
Installing Blabbeur in your Unity Project
You can download Blabbeur Unity Package from here and install it by double-clicking on the file while your Unity project is open. This will add a /Blabbeur folder in your project with everything needed.
Alternatively, you can clone the Blabbeur source from here: https://bitbucket.org/lablablab/blabbeur/ and copy-paste the /Text Generation/Assets/Blabbeur folder in your project.
Setting up the Unity Scene
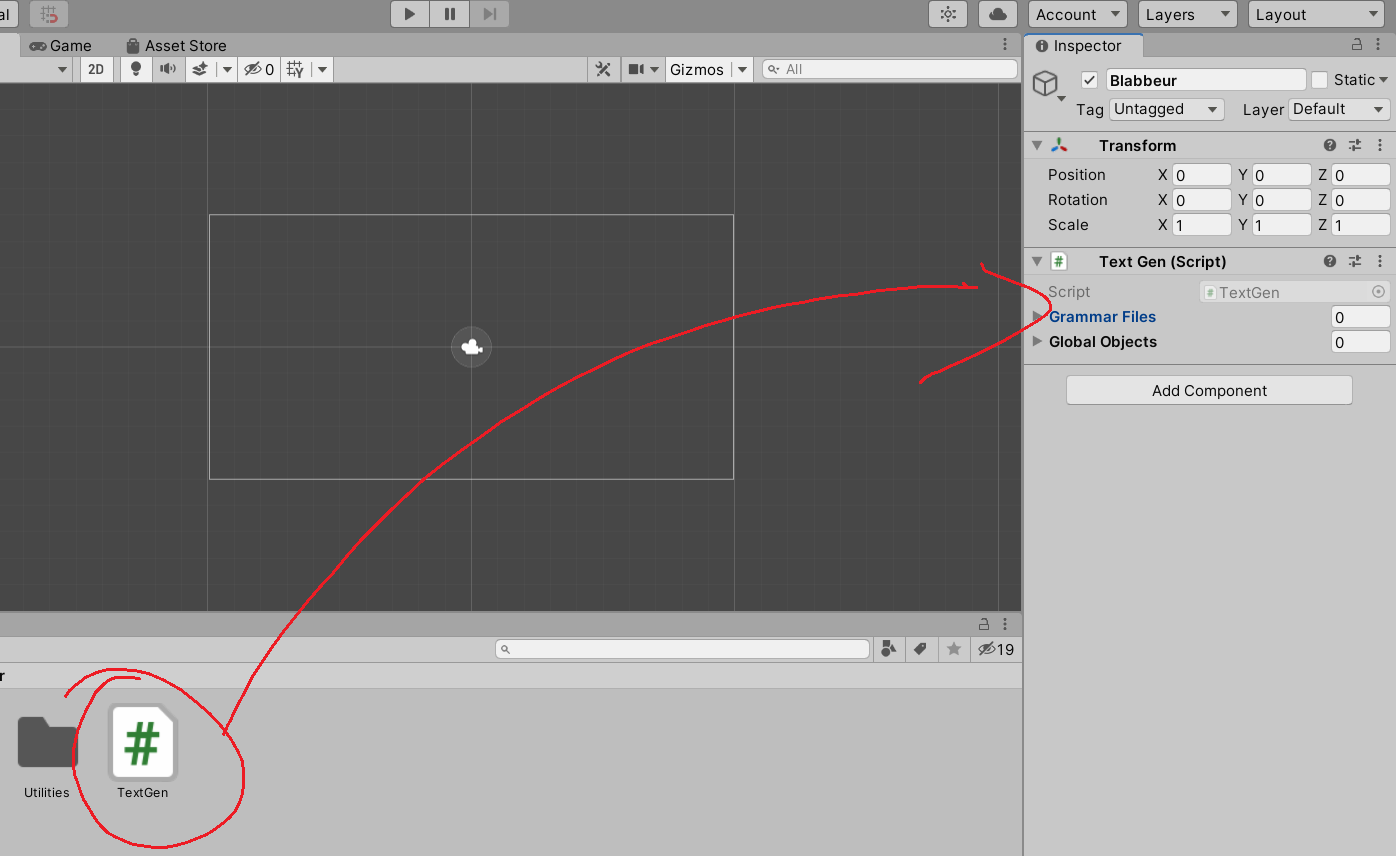
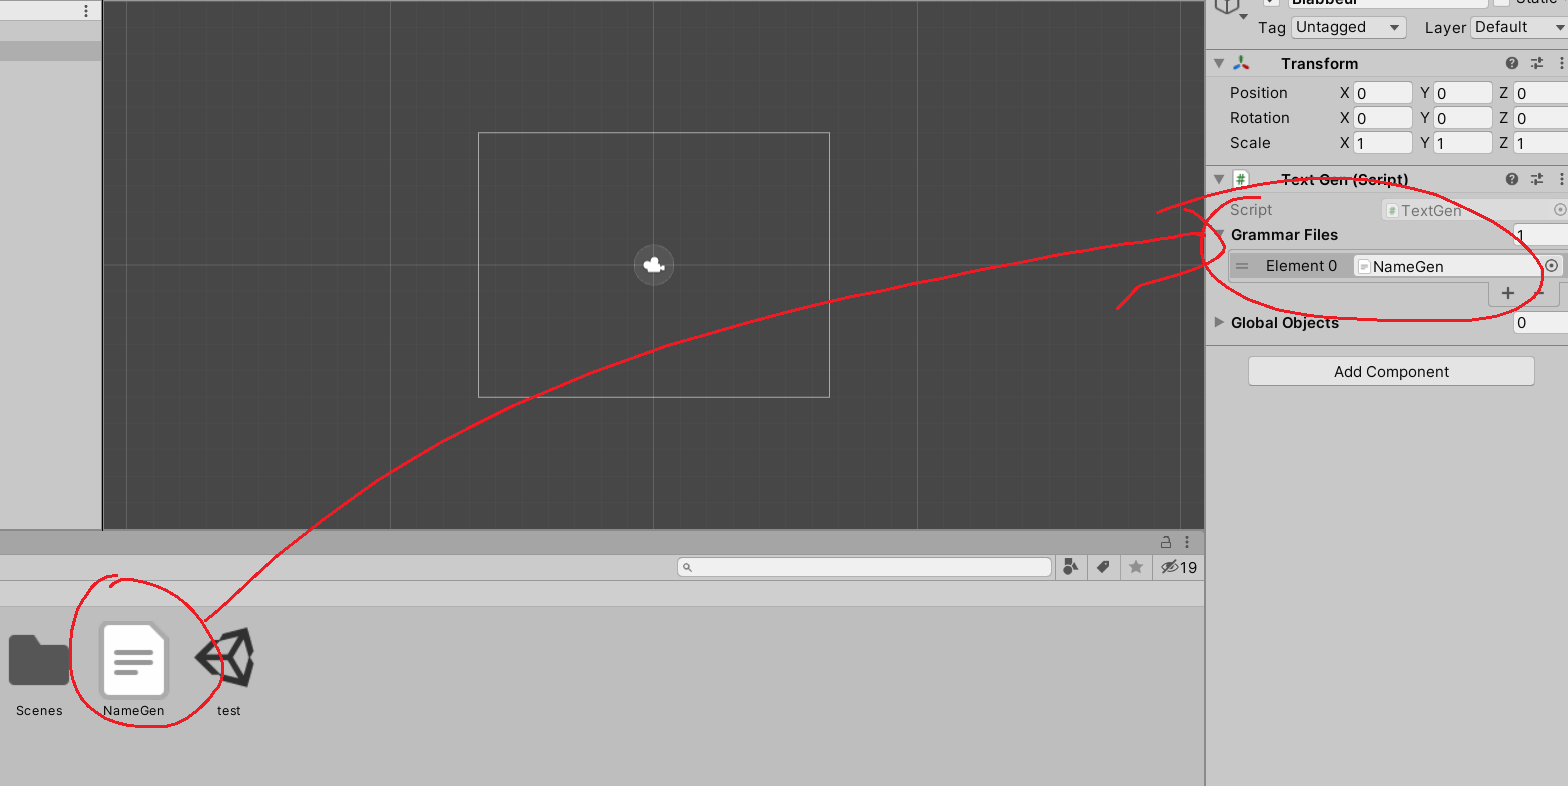
To be able to use Blabbeur, you need to add the TextGen script (found in /Blabbeur/Scripts) to any object in your scene, like this:
Writing a simple Blabbeur Grammar
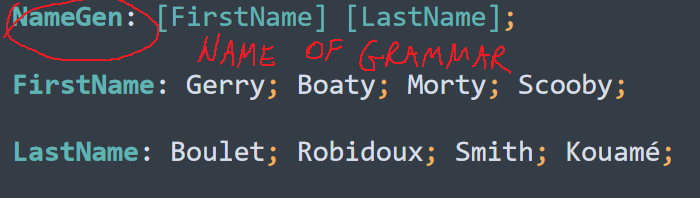
To create a Blabbeur grammar (we call these scripts ‘grammars’ because many concepts derive from the notion of context-free grammars), you simply need to open a text file and begin with a label and a colon, followed by some text. This is the simplest form of Blabbeur grammars:

This grammar will be called by the name “NameGen”, and in its current form will always output the same thing: “Gerry Boulet”. Note that:
- You can save the file with any name (use the .txt extension to make sure Unity recognizes it as a TextAsset — See later about the .blab extension)
- The colors in the screenshot come from our custom syntax highlighting (which will be covered later) but this is just a text file.
- A rule output is concluded by a semicolon. There can be multiple rule outputs as we’ll see just now.
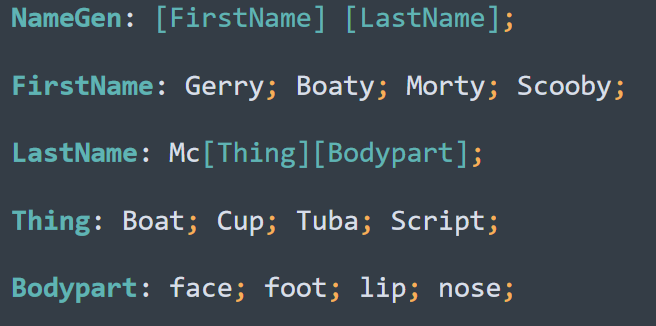
We can already spice up this name generator by adding some opportunities for variation:
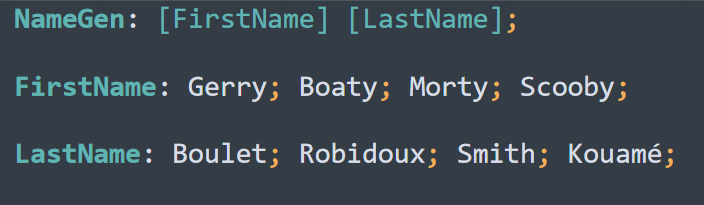
Labels in [brackets] are called ‘non-terminal symbols’ because they are not the final thing. Here, [FirstName] points to another rule identified as FirstName (with a colon) that can randomly be resolved as either “Gerry”, “Boaty”, etc. all separated by semicolons. Possible outputs are:
- Gerry Boulet
- Boaty Boulet
- Morty Kouamé
- etc.
Note that even subrules can include non-terminals. We could further define LastName this way, for example:
…and get outputs such as:
- Scooby McCupnose
- Boaty McScriptface
- Gerry McTubalip
Calling Blabbeur from a Unity Script
The first thing to do is make sure your new Blabbeur grammar is added to the ‘Grammar Files’ list of the TextGen component in your scene:
You can now access Blabbeur from any point of a Unity Script, like this:
    string output = Blabbeur.TextGen.Request("NameGen");
    Debug.Log(output);
In this simple case, the Request function only needs to know the name of the grammar to be expanded and will return a string with an output. Note that the grammar name is not the filename, but the first label in the file (the top rule).
Here are a few outputs from our NameGen grammar:
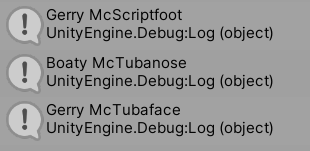
That’s it. Note that:
- You can have as many grammars as you want
- Just make sure you all add them to the grammars list of the TextGen object
Integrating Variables in Blabbeur Grammars
It’s fun to have variation, but it’s often necessary that outputs reflect the reality of the game state. Let’s go back to our first example:
- Hey! This is just to say Alex just landed in Montréal and that he is doing fine.
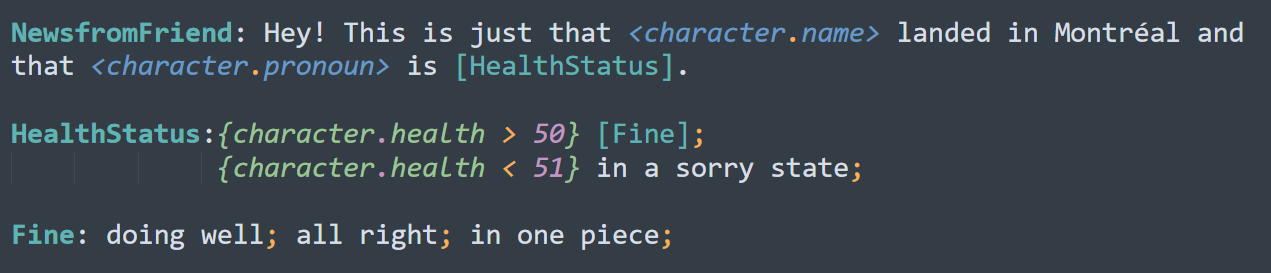
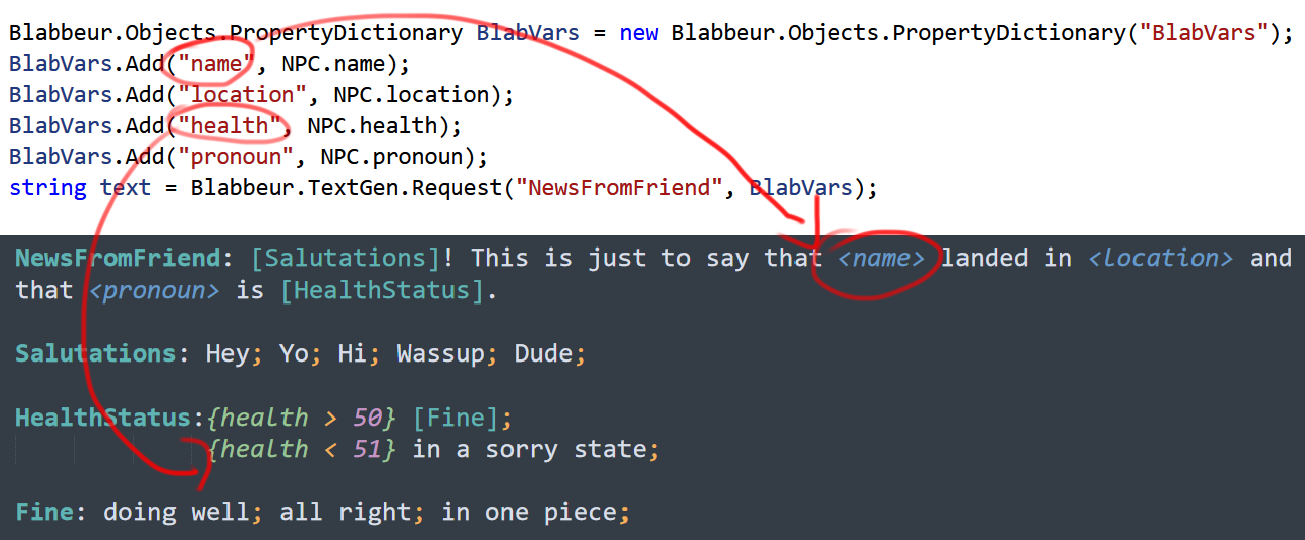
Let’s imagine that in your game, the actual person who lands in Montréal depends on previous players actions and so the game will only know who the actual character is at the time of displaying that text. In Blabbeur, we can tackle this issue by exposing a variable as is:

When putting a label between <angle brackets> Blabbeur will simply replace this by the value of that variable. Of course Blabbeur needs to be aware of that variable at the moment of the request, we’ll cover how to pass these variables a bit later.
Variables can also be used to validate or invalidate some outputs. For example, perhaps the health state of the character might vary at the moment of landing and so we can make sure the generated text reflects that.
Expressions between {curly braces} are interpreted as conditions for a specific output to valid or not. In this case, characters with health above 50 will be either “doing well”, “all right”, etc. While the others will be said to be “in a sorry state”.
- Note that you can mix outputs with conditions and without conditions. Those without conditions will always be eligible.
- Conditions can use the following operators: !=, ==, <, >, >=, <=, &&, ||
- Conditions can have multiple clauses like: {character.health >75 && character.healt < 100}
Passing Variables to Blabbeur
The most straightforward way to pass variables with a Blabbeur request is to build a PropertyDictionary with whatever info you grammar might need. Here is an example:
Notes on the PropertyDictionary:
- When creating a new PropertyDictionary, you need to define its ID as string (here “BlabVars”).
- Adding a variable requires first the name of that variable as string (this is how you will access it in your grammars) and the value.
- Values can be ints, floats, strings, bools, doubles, and even another PropertyDictionary containing other values (this how you would do “character.name”, we’ll see this later).
- Values can be later modified like this: BlabVars[“health”] = 24
- Adding a Property with the same name will overwrite the previous property.
Notes on the Request:
- The Request now has two arguments: the grammar name and a PropertyDictionary.
- BTW if you want your generation to begin at any other rule than the top rule you can also make requests like this: Request(NameOfGrammar, RuleName, PropertyDictionary)
Bundling properties for more complex objects
You might have noticed that in our previous grammar, we referred to <character.name> and not simply <name> (which we could also have done). But in a grammar, there might be names for many different things, multiple characters for example. So we can create a PropertyDictionary for each complex object, and then pass these to the more general PropertyDictionary for the request. Here’s how we could do it to get our grammar to actually work as written:
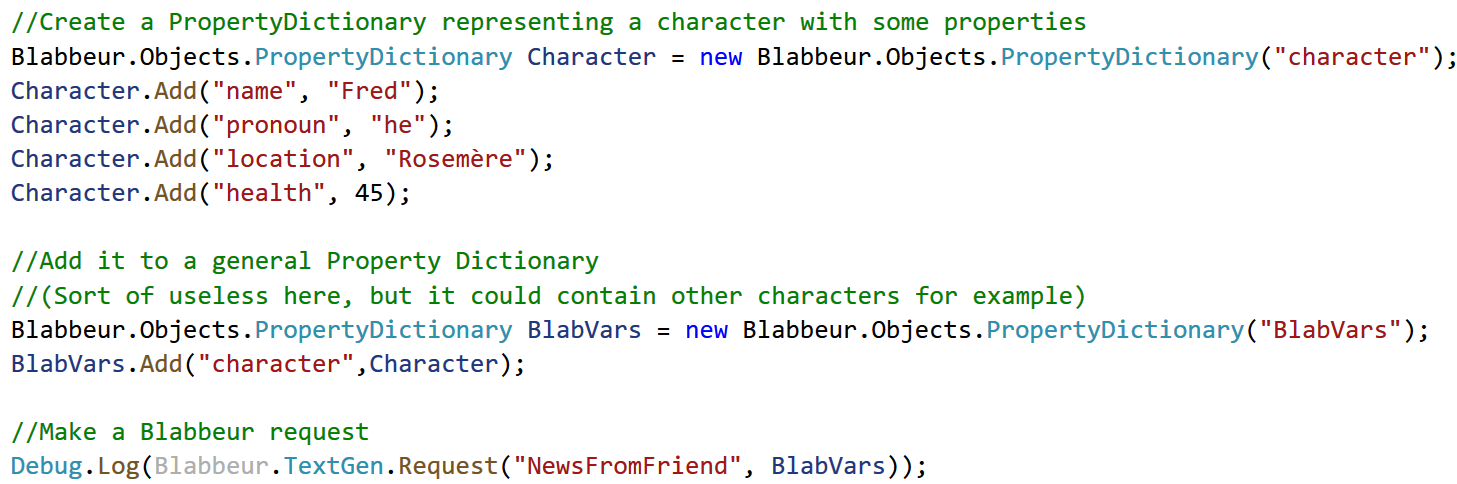
Note that we’ve named our first PropertyDictionary “character”. This is how Blabbeur will know that <character.name> refers to the “name” property of the “character” PropertyDictionary.
Since all this happens at runtime, we can also use generated content! For example, we could use our name generator to define this character’s name.


Interfacing directly with your own classes (advanced)
It is likely that you already have something like a Player class or Character class that contains all the information you might want to pass to Blabbeur grammars. Rather than manually building PropertyDictionaries for every request, you can make sure your own classes implement the BlabbeurObject interface and then pass them directly with your requests.
To do this, you first need to declare that your class will implement the BlabbeurObject Interface:

This will require that your class implements a number of properties and functions. Most of them will be useless and are only necessary in internal uses of this interface. You will only care about the ID (a unique string identifier for this object) and the RequestString(string value) function.
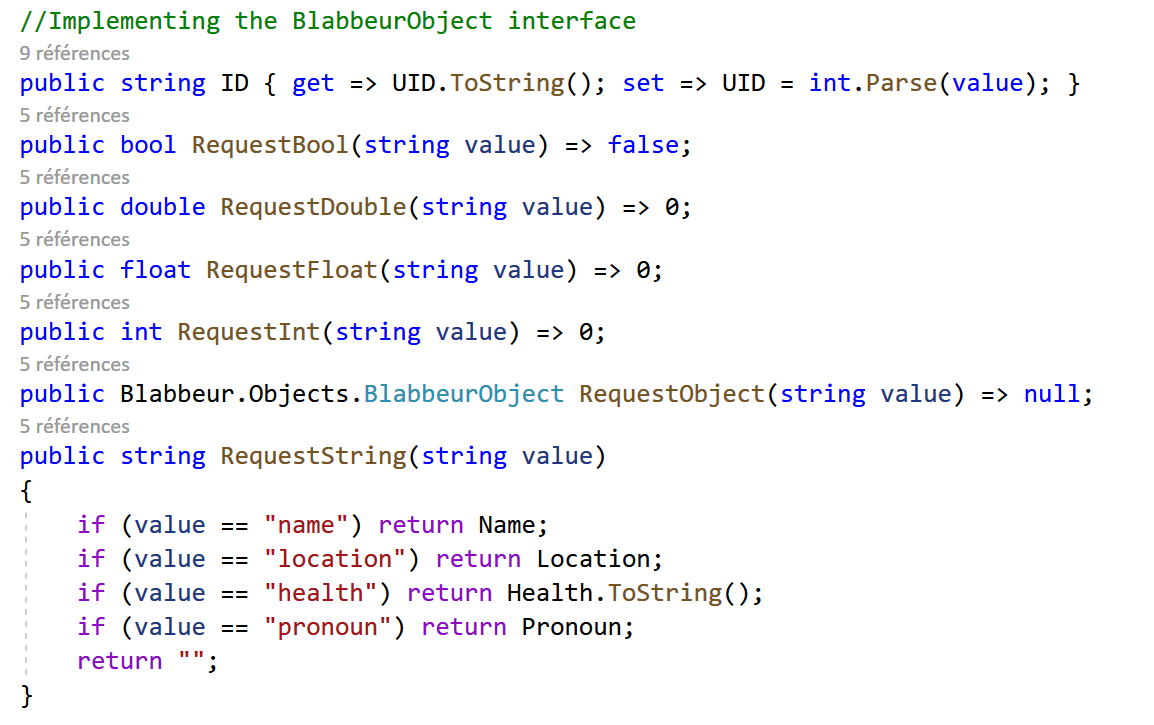
In this example, ID is a conversion from my class’ numerical UID.
All other variables can be communicated through RequestString even if they are not strings. I know this is counterintuitive but Blabbeur will internally find out whether these values are strings or numbers.
The good news is that once you’ve done that, you can simply pass your own classes to Blabbeur and you will have access to all exposed variables from within the grammars.

Grammar Syntax Recap
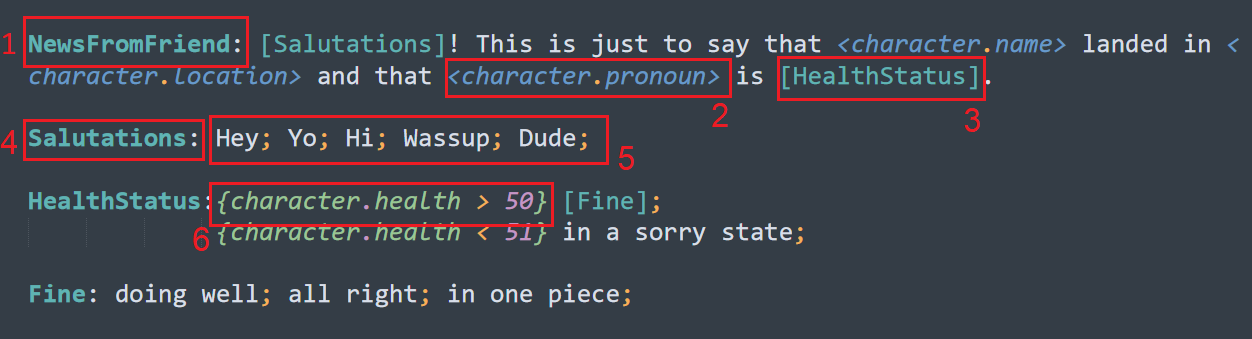
- A Blabbeur grammar begins with a top rule defined by a label followed by colon. This is both the grammar’s identifier and the default point of entry of generation. (Note that a request can manually specify another rule as point of entry).
- Labels with <angle brackets> are replaced with the value of a passed variable of the same name.
- Labels withing [square brackets] are non terminal symbols resolved by rules of the same name.
- Other rules are also defined as a label followed by a colon.
- Possible outputs of rules are separated by semicolons. These will be picked at random. All rules must have at least one output.
- Conditions defined as expressions within {curly brackets} validate or invalidate specific rule outputs.
Syntax Highlighting in Sublime Text
We have defined a custom Blabbeur syntax in the Sublime Text editor. It is in no way necessary but does help with legibility and easy of authorship. The necessary files can be downloaded here: https://bitbucket.org/lablablab/blabbeur/src/master/Sublime%20Syntax
Procedure:
- Open SublimeText’s Packages folder by opening Sublime Text, then going to Preferences -> Browse Packages
- Copy paste the two files there (Blabbeur.sublime-syntax and Mariana.sublime-color-scheme)
- In Sublime Text: Preferences -> Color Scheme, then select Mariana
Once this is is set up, you will be able to navigate to View -> Syntax and choose Blabbeur as your syntax highlighting scheme for the current file or all files of the same extension.
The .blab file extension
Although all file extensions will work with Blabbeur, we have chosen to use the .blab file extension as a convention. Such files will automatically be opened with the Blabbeur syntax highlighting (if the necessary packages have been installed.
The problem is that Unity will not recognize .blab files as TextAssets, which we need it to do. The workaround is to add this script in the /Assets/Editor folder of your project:
using UnityEngine;
using UnityEditor;

using System.IO;

[UnityEditor.AssetImporters.ScriptedImporter(1, "blab")]
public class BlabFileSupport : UnityEditor.AssetImporters.ScriptedImporter
{
    public override void OnImportAsset(UnityEditor.AssetImporters.AssetImportContext ctx)
    {
        TextAsset subAsset = new TextAsset(File.ReadAllText(ctx.assetPath));
        ctx.AddObjectToAsset("text", subAsset);
        ctx.SetMainObject(subAsset);
    }
}
The Blabbeur Test Scene
You can test your grammars in the provided Blabbeur Test scene (found in /Blabbeur/Scenes)
The main thing you need to do is add the grammar files you want to test in the TextGen component found on the Blabbeur Object.
You can then press “Play” (note that the interface is designed for a 4:3 screen format)
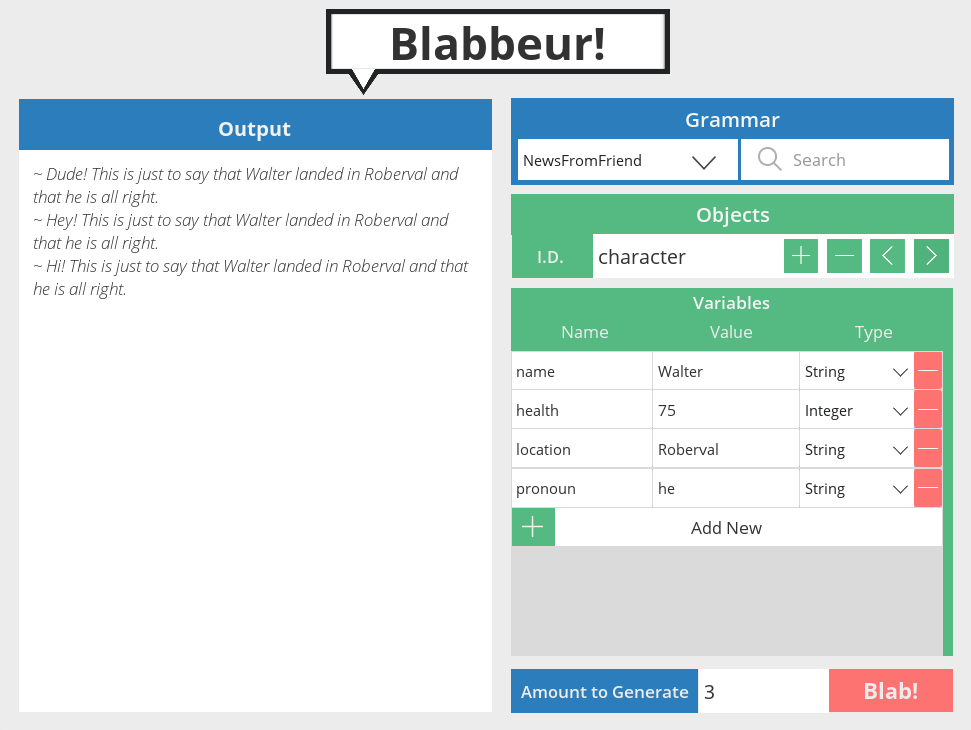
From the interface, you can:
- Select the grammar you want to test
- Add custom variables to alter the generation
- Click “Blab!” to generate a number of variations
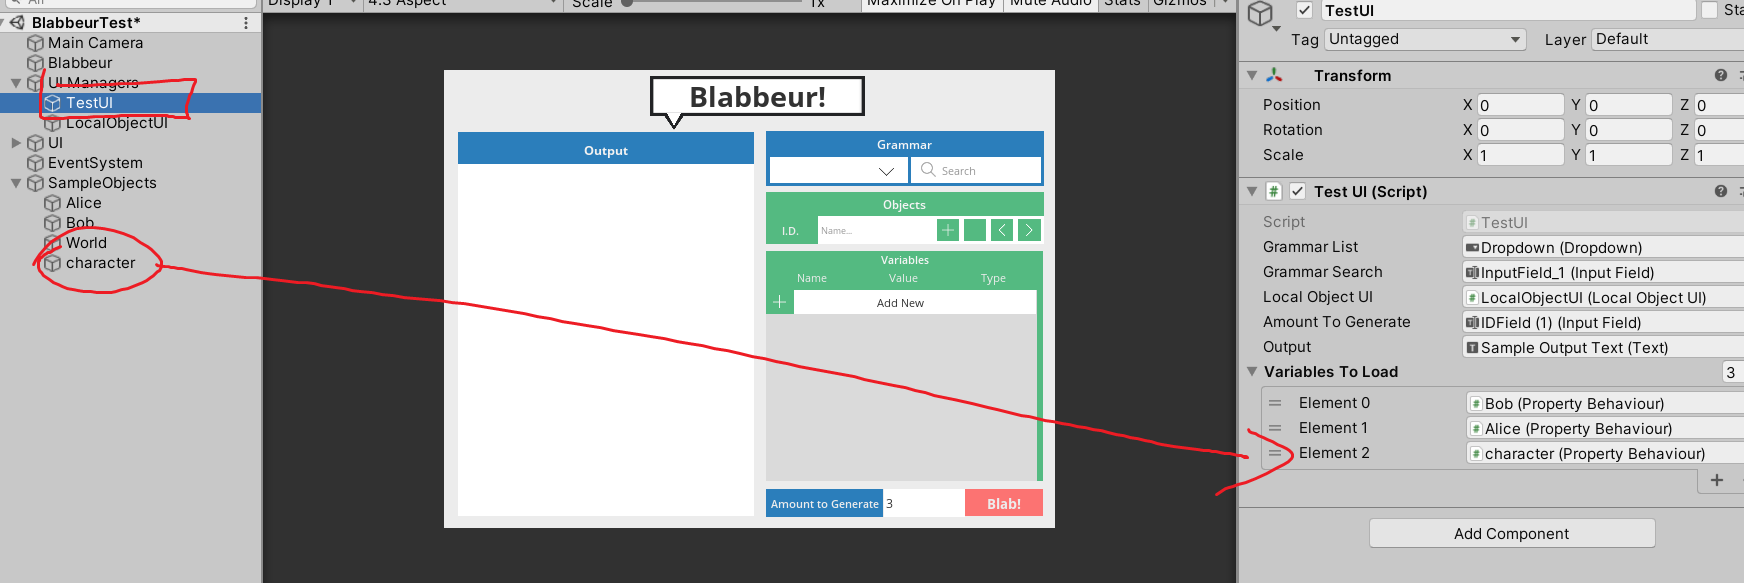
If you want some Property objects to be stable within sessions (for example, you will often have to test things with your character definition) you can make objects with the PropertyBehaviour script (there are a few in the test scenes which you can just duplicate).
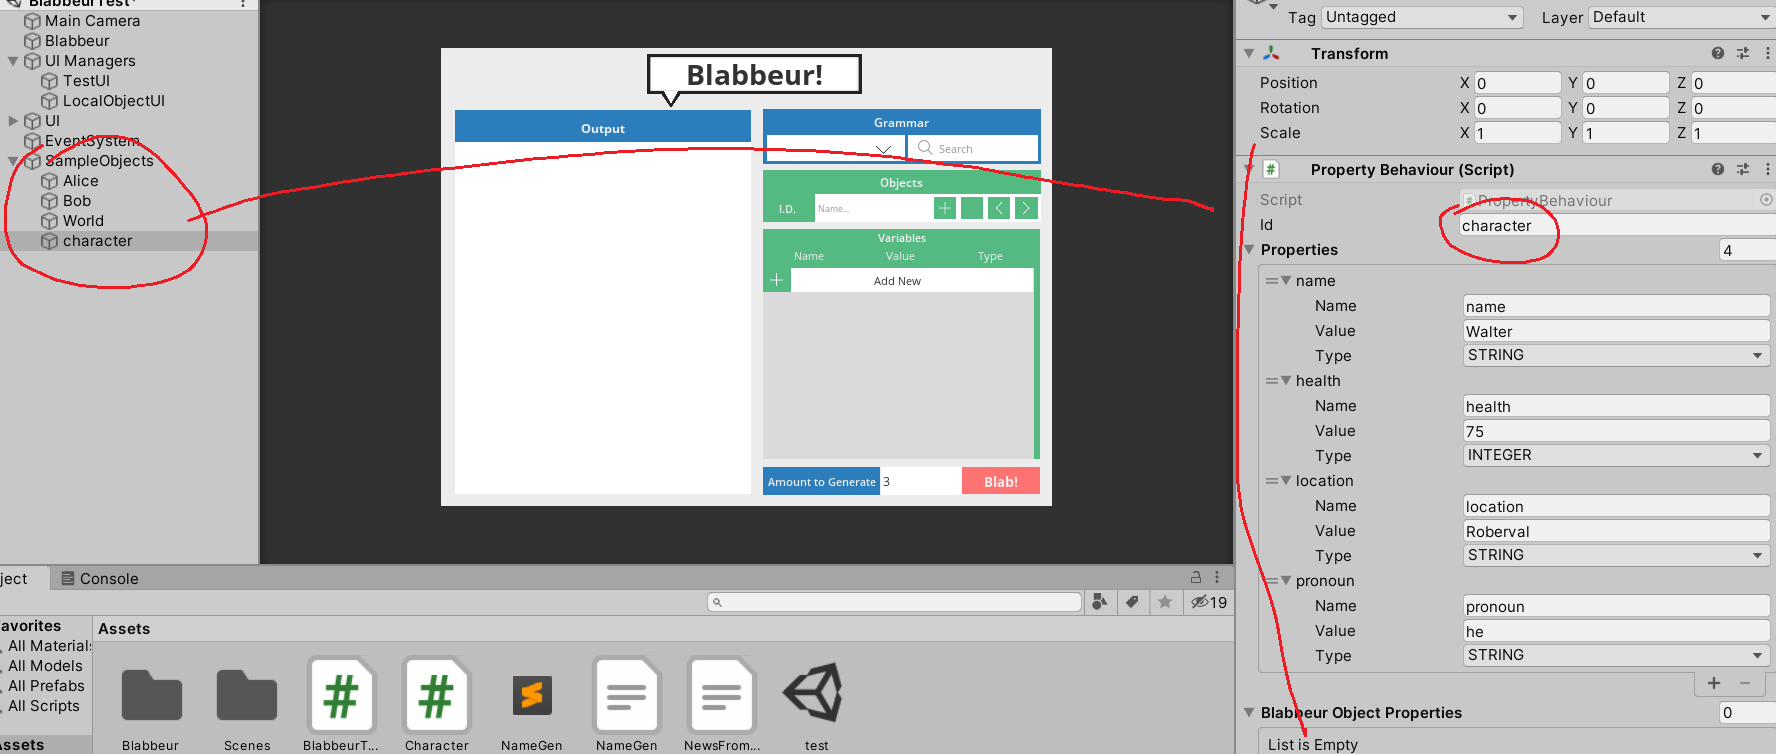
You then need to add them to a list in UIManagers / TestUI and they will be selectable from the interface via the “Objects” panel. If you save the scene, these will be there the next time you open it.